I have been using Ngrok for almost two years in order to test webhooks during development. It works really well, true; but even the personal plan costs $96 a year if you want a fixed URI. I recently came across Frp, a reverse proxy packed with useful features. This is how I used it to replace Ngrok entirely.
Of course you will need a server running somewhere. It does not have to be powerful, even the smallest VPS will do the work just fine. Personally I use FreeBSD, but Frp is written in Go and should run anywhere.
Configuring the server
Frp server
Server configuration turned out to be more complicated than expected. In the
current state, the FreeBSD package runs Frp as the nobody user, meaning that
it cannot read external files owned by root such as a TLS key. In a perfect
world, Frp would start as root, would read the TLS key and certificate then
would switch to a non-privileged user. Infortunately Frp does not support that.
Of course we could let Frp run as root, but there is a much better solution.
Since I already use NGINX, what about simply letting it handle TLS? This way
Frp can run as a non-privileged user without any issue.
Let’s make it happen! First we configure the Frp server; the configuration
(located at /usr/local/etc/frps.ini on FreeBSD) is minimal:
[common]
bind_addr = 127.0.0.1
bind_port = 6001

proxy_bind_addr = 127.0.0.1
vhost_http_port = 8042

authentication_method = token
token = 12345678
We bind both the main interface and the proxy interface to a local address
since we are going to use NGINX as front. We also require token authentication
from any Frp client. Of course do not forget to replace 12345678 by a proper
random password.
You may also want to patch the rc script at /usr/local/etc/rc.d/frps to
run Frps as a dedicated user, and make sure that the configuration file is
owned by it with permissions 0600.
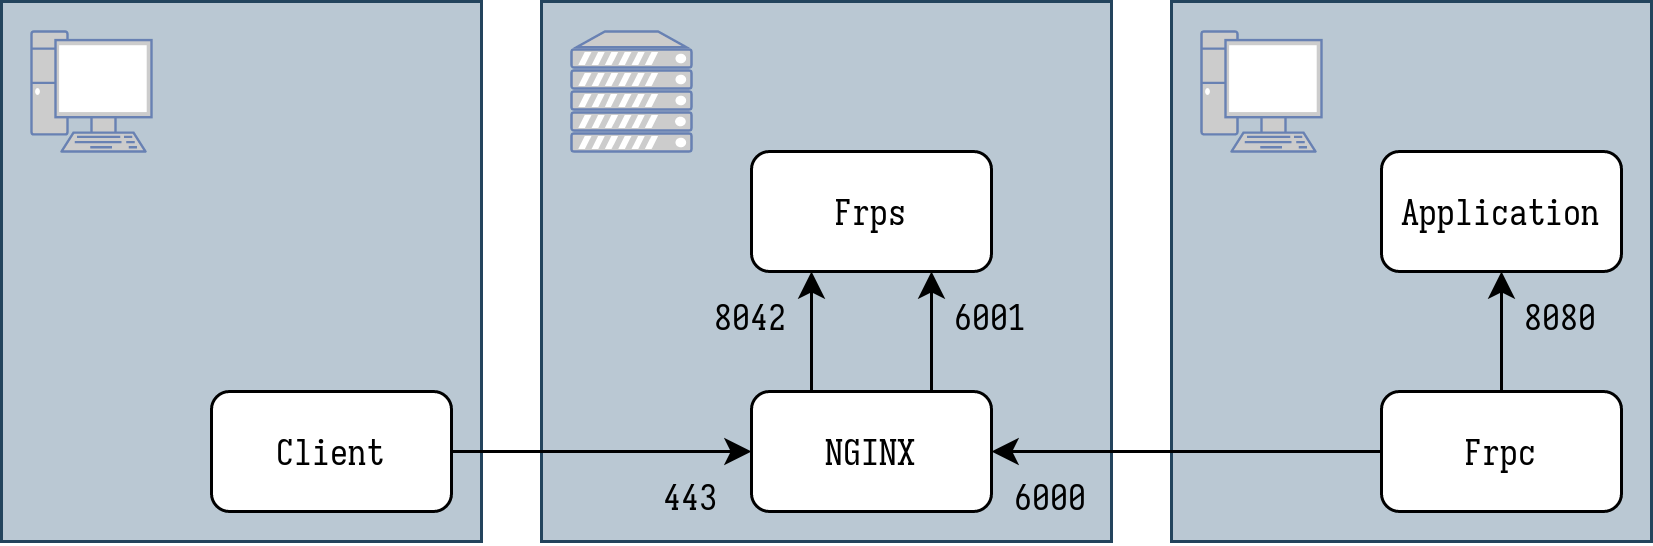
NGINX
For NGINX, we need a more complex configuration.
We first need a block to define a HTTPS interface which will be used to access what is running on our workstation:
https {
    server {
        listen 443 ssl;
        listen [::]:443 ssl;

        server_name dev.example.com;

        ssl_certificate /etc/ssl/certs/dev.example.com.crt;
        ssl_certificate_key /etc/ssl/private/dev.example.com.key;

        access_log /var/log/nginx/access-dev.log combined;

        location / {
            proxy_pass http://localhost:8042;

            proxy_set_header Host $host;
            proxy_set_header X-Request-Id $request_id;
            proxy_set_header X-Forwarded-For $proxy_add_x_forwarded_for;
        }
    }
}
Obviously you will have to adjust the server name and SSL certificate file paths (my certificate comes from Let’s Encrypt and is generated by Lego).
Then we need a TCP interface to connect to the control port of the Frps server. NGINX can do just that with the stream module. On FreeBSD it is compiled as a dynamic library, so we have to load it first.
load_module /usr/local/libexec/nginx/ngx_stream_module.so;

stream {
    upstream frps {
        server 127.0.0.1:6001;
    }

    server {
        listen 6000 ssl;

        ssl_certificate /etc/ssl/certs/dev.example.com.crt;
        ssl_certificate_key /etc/ssl/private/dev.example.com.key;

        proxy_pass frps;
    }
}
I was positively surprised by how simple it is. Again, NGINX saves the day.
The resulting architecture is a bit convoluted, but it works.
Configuring the client
As Ngrok, Frp requires a client to run on your workstation. Fortunately it is already available on AUR for Archlinux, so installing it was trivial:
git clone https://aur.archlinux.org/frp.git
cd frp
makepkg
sudo pacman -U ./frpc-0.48.0-1-x86_64.pkg.tar.zst
The default path for the configuration file is ./frpc.ini which is a really
bad idea. Ideally you would want a standard absolute location such as
~/.frpc.ini or ~/.config/frpc.ini. But we work we what we have.
I went with a small script to run the client, and stored it at ~/bin/frpc
since ~/bin/ is my PATH environment variable.
#!/bin/sh

exec /usr/bin/frpc --config $HOME/.frpc/frpc.ini "$@"
This way I can run frpc without having to worry about the path to the configuration file. And in the future, if I end up needing several configurations, I can easily add options to the script to select the right file.
The configuration itself is quite simple:
[common]
server_addr = server.example.com
server_port = 6000

tls_enable = true
disable_custom_tls_first_byte = true

authentication_method = token
token = 12345678

[web]
type = http
local_port = 8080
custom_domains = dev.example.com
In the common section, we indicate how to contact the Frp server and how to
authenticate. You will notice the strange disable_custom_tls_first_byte
option. Frp uses a single byte sent by the client to identify whether the
connection is going to use TLS or not, allowing it to support both TLS and
non-TLS connections on the same port. Since we use NGINX as TLS interface, we
need to instruct the client not to send this first byte.
In the web section, we declare our web proxy: we will access our local
application on dev.example.com, and we expect it to listen locally on
port 8080. Obviously you will have to choose a domain you control and make
sure it points to the Frp server.
Done!
At this point, the only thing left is to start the Frp client on your workstation. It will connect to the Frp server, and you will then be able to publicly access your local application from the domain specified.
Communication between the Frp client and server is secured with TLS, and the application is exposed using HTTPS, both thanks to NGINX. All good!
You should also have a look at the Frp readme because it can do much more than just proxying HTTP traffic. OIDC authentication, builtin admin interface, Prometheus metrics, load balancing, you probably will find something useful to you.